让写blog的人专注于blog,实现全自动issue_blog,use:Issue + Hexo + Github Action
关于我吝啬(不愿买服务器)又懒惰(写博客不想太麻烦),所以在全网网罗众多blog搭建idea,最后形成这篇blog这件事
本文主要借鉴于Github的一个issue_blog项目
yihong0618/gitblog
最终效果可参考
建立个人博客网站是在网上混迹的不错方式
相信有些人会在issue上记录自己的点滴,提交issue非常方便可惜缺少美观界面,也有些人使用hexo等静态网站,但是hexo等上传blog确实有些麻烦。
集思广益后,个人认为这份只需要用issue提交blog,通过Github Action来自动生成Readme,并自动部署博客到静态网站的方法也许值得一试。
一,配置Blog repo:
clone这个仓库到你想用来建立博客的仓库
这份博客运作的核心有三:
- main.py: 内含生成readme的逻辑
- generate_readme.yml: 通过action自动调用main.py生成readme
- generate_page.yml: 在readme生成后,将博客部署到Gitpage网站
必须执行的操作(require)
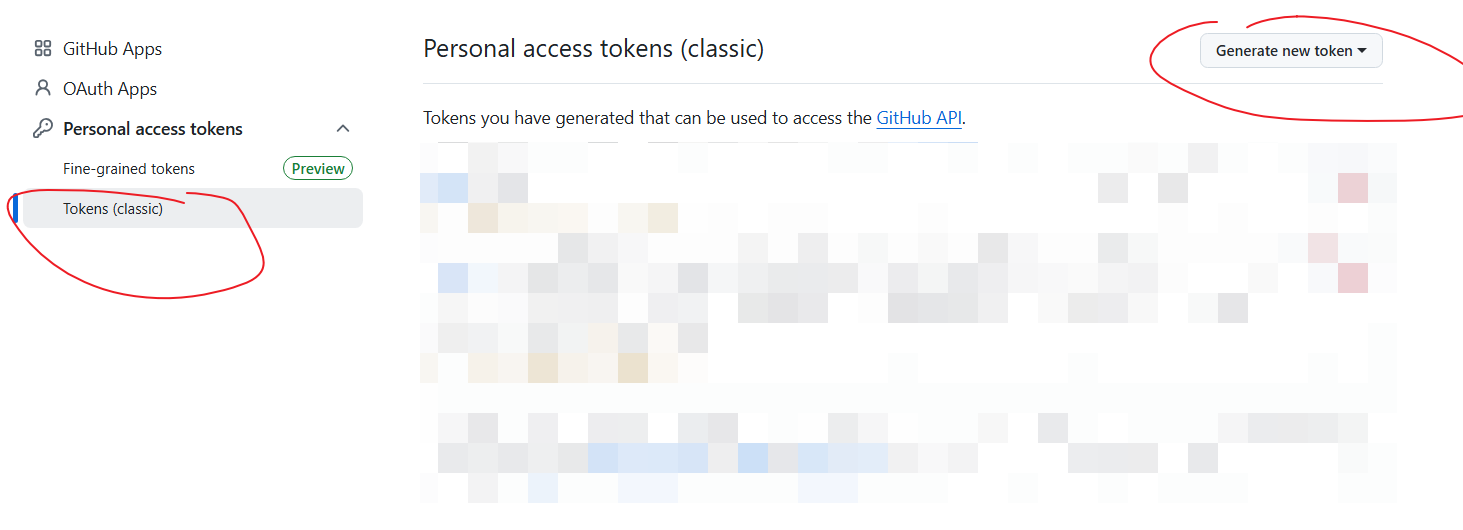
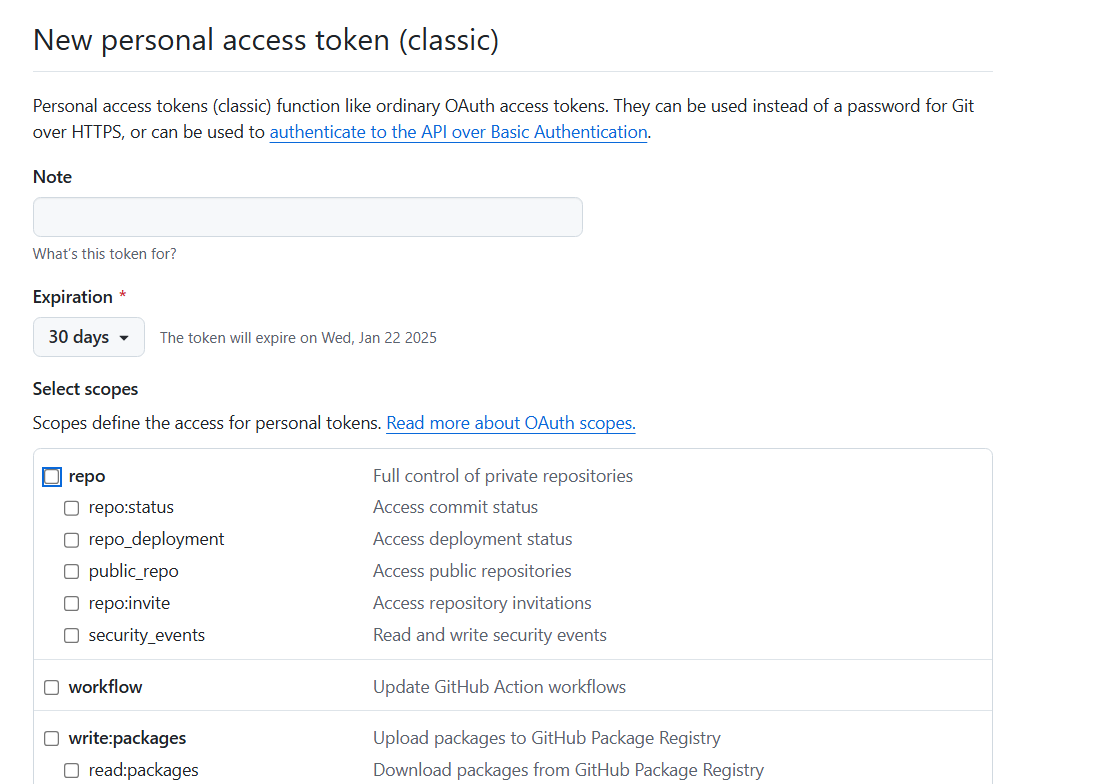
1. 获取你的Github Token
有效期建议无限,否则每次过期你需要重新替换。
后面权限建议全部勾选,以防workflow权限不够。
最后Generate token便可获取,注意保存这个字符串,只会出现这一次
2. 在你博客仓库的settings的Actions secrets and variables添加你刚刚获得的token。
建议命名为G_T(否则需要把2个workflow里面的G_T改为你设定的名字)
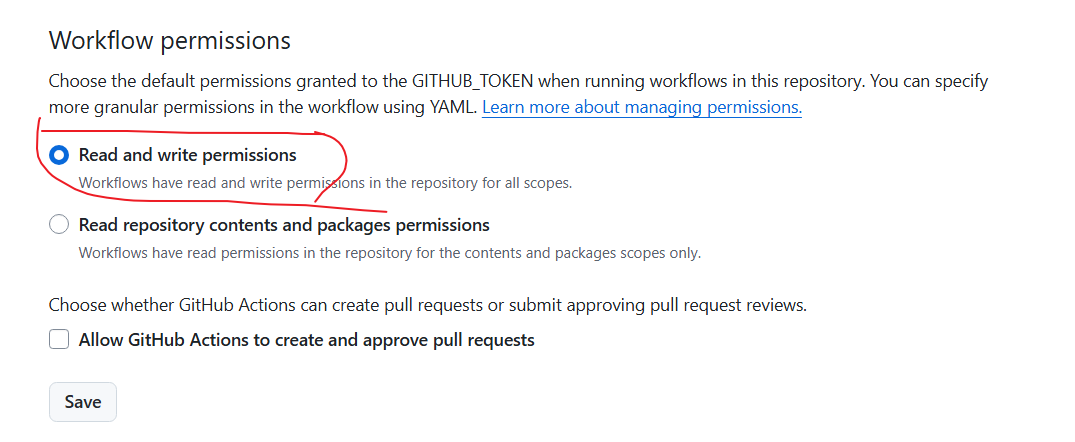
3.在你博客仓库的settings的Actions :General里运行workflow的读写权限
4. 删除Blog文件夹
因为里面是我博客的存档(😓)
Option
- 更改main.py的MD_HEAD内容,这个会写在readme头部
执行后上述操作,你以后每次写issue(可以打上相关的label),都会更新到readme作为一个索引目录了。
readme会根据你打的label对你的博客进行分类
二,配置 Github Page
yihong0618/gitblog是使用Zola配置了Github Page。我后面也会简要介绍一下zola的配置
我这里提供一种hexo的配置思路,采用的主题是kira
1. 你可以根据你选择的hexo主题进行本地配置后,把这个主题上传到你的私人仓库方便后面workflow来clone
- 我也提供了一个公共仓库以便您进行测试,你可以先暂时使用这个https://github.com/WQhuanm/Test_Blog_Repo.git
- 建议私人仓库,因为你配置文件极可能有个人敏感信息
- 建议先在本地测试好你的静态网站部署是成功的,然后配置成私人仓库给workflow来clone,毕竟本地调试和配置要容易的多
- 如果你配置好了自己的私人仓库,请在package.json添加这段代码:
(否则你必须把generate_page.yml中Generate Hexo public里面run的最后一部分即”&& gulp”删除,这个gulp用于压缩文件,提高前端页面访问效果的)1
2
3
4
5
6
7
8
9
10
11
12
13"devDependencies": {
"gulp": "^4.0.2",
"gulp-minify-css": "^1.2.4",
"gulp-babel": "^8.0.0",
"gulp-uglify": "^3.0.2",
"gulp-htmlmin": "^5.0.1",
"gulp-htmlclean": "^2.7.22",
"gulp-imagemin": "^7.1.0",
"imagemin-jpegtran": "^7.0.0",
"imagemin-svgo": "^11.0.0",
"imagemin-gifsicle": "^7.0.0",
"imagemin-optipng": "^8.0.0"
} - 其次,您需要在你的私人仓库根目录添加一个文件,名字为:gulpfile.js ,内容如下:
1
2
3
4
5
6
7
8
9
10
11
12
13
14
15
16
17
18
19
20
21
22
23
24
25
26
27
28
29
30
31
32
33
34
35
36
37
38
39
40
41
42
43
44
45
46
47
48
49
50
51
52
53
54
55
56
57
58
59
60
61
62
63
64
65
66
67
68
69
70
71
72
73
74var gulp = require("gulp");
var minifycss = require("gulp-minify-css");
var uglify = require("gulp-uglify");
var htmlmin = require("gulp-htmlmin");
var htmlclean = require("gulp-htmlclean");
var imagemin = require("gulp-imagemin");
// 压缩css文件
gulp.task("minify-css", function () {
return gulp
.src("./public/**/*.css")
.pipe(minifycss())
.pipe(gulp.dest("./public"));
});
// 压缩html
gulp.task("minify-html", function () {
return gulp
.src("./public/**/*.html")
.pipe(htmlclean())
.pipe(
htmlmin({
collapseWhitespace: true,
collapseBooleanAttributes: true,
removeComments: true,
removeEmptyAttributes: true,
removeScriptTypeAttributes: true,
removeStyleLinkTypeAttributes: true,
minifyJS: true,
minifyCSS: true,
minifyURLs: true,
ignoreCustomFragments: [/\{\{[\s\S]*?\}\}/],
})
)
.pipe(gulp.dest("./public"));
});
// 压缩js文件
gulp.task("minify-js", function () {
return gulp
.src(["./public/**/*.js", "!./public/js/**/*min.js"])
.pipe(uglify())
.pipe(gulp.dest("./public"));
});
// 压缩图片
gulp.task("minify-images", function () {
return gulp
.src([
"./public/**/*.png",
"./public/**/*.jpg",
"./public/**/*.gif",
"./public/**/*.svg",
])
.pipe(
imagemin([
imagemin.gifsicle({ interlaced: true }),
imagemin.mozjpeg({ quality: 75, progressive: true }),
imagemin.optipng({ optimizationLevel: 5 }),
imagemin.svgo({
plugins: [{ removeViewBox: true }, { cleanupIDs: false }],
}),
])
)
.pipe(gulp.dest("./public"));
});
gulp.task(
"default",
gulp.series(
gulp.parallel("minify-html", "minify-css", "minify-js", "minify-images")
)
);
2. 修改 .github\workflows\generate_page.yml,参考里面的注释
- 修改BASE_URL
- 修改jobs:deploy:steps:name: Generate Hexo public 里面的克隆仓库(也可以改成我提供的仓库来测试:https://github.com/WQhuanm/Test_Blog_Repo.git)
3. 请把博客仓库的settings的page的生成改成使用action生成
否则GitPage的部署默认使用分支部署,呈现出来的页面即是你的readme内容
配置后,用issue写文章格式如下
- issue的第一行如果是md的图片链接,会设定为你网站博客的头图,否则使用默认头图
- issue打上milestone时,网站会对该文章进行分类
- issue打上labels时,网站会对该文章添加tags(可有多个tag)
Option
- workflow生成page时,已经使用了上文提到的gulp对网站的文件进行压缩,如果网站图片不是那么多的话,无梯子下访问速度还是很快的,如果你有很多图片上传的需求,推荐你使用国内主流图床或者使用Github做图床+CDN技术来优化,可以参考jsDelivr和Github配合才是最佳免费CDN,五分钟学会使用,附搭建免费图床教程
使用Zola简易配置Gitpage
- 你无需弄一个私有仓库了,只需要在博客仓库根目录添加一个config.toml文件,内容如下:
1
2
3
4
5
6
7
8
9
10
11
12
13
14
15
base_url = "https://{username}.github.io/{your blog repo}/" #如果repo是{username}.github.io,请改为https://{username}.github.io/
generate_feeds = true
feed_filenames = ["rss.xml"]
theme = "even"
taxonomies = [
{name = "categories", feed = true},
{name = "tags", feed = true},
]
[extra]
even_title = "yihong0618's Blog"
even_menu = [
{url = "$BASE_URL", name = "Home"},
{url = "$BASE_URL/tags/top/", name = "Top"},
{url = "$BASE_URL/issue-282/", name = "About"},
] - generate_page.yml改为这个
1
2
3
4
5
6
7
8
9
10
11
12
13
14
15
16
17
18
19
20
21
22
23
24
25
26
27
28
29
30
31
32
33
34
35
36
37
38
39
40
41
42
43
44
45
46
47
48
49
50
51
52
name: Deploy static content to GitPages
on:
workflow_dispatch:
workflow_run:
workflows: [Generate GitBlog README] # Depends on the completion of the workflow: Generate GitBlog README
types:
- completed
# Sets permissions of the GITHUB_TOKEN to allow deployment to GitHub Pages
permissions:
contents: read
pages: write
id-token: write
concurrency:
group: ${{ github.workflow }}
cancel-in-progress: true
jobs:
deploy:
environment:
name: github-pages
url: ${{ steps.deployment.outputs.page_url }}
runs-on: ubuntu-latest
env:
GH_TOKEN: ${{ github.token }}
ISITE_VERSION: v0.1.3
ZOLA_VERSION: v0.19.2
USER: ${{ github.repository_owner }}
REPO: ${{ github.event.repository.name }}
#if you use Gitpage and your repo'name is not {usernmae}.github.io,please use this
BASE_URL: https://${{ github.repository_owner }}.github.io/${{ github.event.repository.name }}
# else if your repo's name is {usernmae}.github.io,please use this,please use this
# BASE_URL: https://${{ github.repository_owner }}.github.io/${{ github.event.repository.name }}
steps:
- name: Checkout
uses: actions/checkout@v4
- name: Generate markdown
run: |
gh release download $ISITE_VERSION --repo kemingy/isite -p '*Linux_x86_64*' --output isite.tar.gz
tar zxf isite.tar.gz && mv isite /usr/local/bin
isite generate --user $USER --repo $REPO
gh release download $ZOLA_VERSION --repo getzola/zola -p '*linux*' --output zola.tar.gz
tar zxf zola.tar.gz && mv zola /usr/local/bin
cp config.toml output/config.toml
cd output && zola build --base-url $BASE_URL
- name: Setup Pages
uses: actions/configure-pages@v4
- name: Upload artifact
uses: actions/upload-pages-artifact@v2
with:
path: 'output/public'
- name: Deploy to GitHub Pages
id: deployment
uses: actions/deploy-pages@v3参考文章:
这个博客开源了
使用 GitHub Issues 来写博客,真香。
jsDelivr和Github配合才是最佳免费CDN,五分钟学会使用,附搭建免费图床教程
加快GitHub Pages国内访问速度


